Go Back
Print
No ratings yet

Making a Valentine's Day Mobile using Tissue Paper Hearts

Prep Time10 minutes
Active Time15 minutes
drying time1 hour
Total Time1 hour 25 minutes
Author: Vicky

Materials

  • White copy paper 3 sheets
  • Scissors
  • Small cup with water
  • Small paintbrush
  • Tissue paper cut into squares we used reds and pinks
  • White or clear thread
  • Scotch tape

Instructions

  •  Cut a heart out from each piece of paper. Cut out one large, medium, and small heart.
  • Place a cup of water, a small paintbrush, and some tissue paper squares in various shades of red and pink onto a tray.
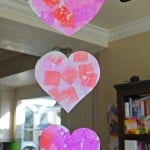
  • Place the tissue paper in random places on the heart and "paint" over the paper with water.
  • Make sure you cover all the tissue paper with water. This will give the tissue paper a chance to bleed its colors onto the white paper.
  • When all three hearts are covered with tissue paper, allow them to dry for a few hours.
  • When dry, peel off the pieces of tissue paper to reveal a colorful pattern on the hearts.
  • Attach a length of neutral thread to the back using scotch tape. Attach the hearts in decreasing size starting withe the large heart. Leave a few inches between each heart. Tape a loop of thread to the top and your Tissue Paper Dyed Hearts are ready for hanging.

Video

Notes

  • If you don't want to cut out squares of tissue paper, you can just tear large tissue paper into small pieces or better yet, have your child do it for some fine motor skills practice.
  • She was pretty determined to try and cover as much of the white space as she could, but these would look pretty with some white spots peeking through as well.
  • This is optional, but you may wish to run a warm iron over the paper hearts to make them perfectly straight before hanging. I used a low setting on my iron and sandwiched the hearts between some paper towels before ironing.
QR Code linking back to recipe