Melted Snowman Craft
This Melted Snowman Craft is fun to make and can either be used as is, or can be easily turned into an ornament for your Christmas tree.
Materials
- Black & White Felt
- Orange Pipe CleanerRed Ric Rac Trim or Ribbon
- Googly Eyes
- White Poms
- Buttons
- Skinny Tree Branches
- Black Acrylic Paint
- Paintbrush
- Hot Glue or Elmer’s Glue
- Scissors
Instructions
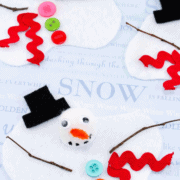
- Glue two eyes on each white pom pom. Cut an orange pipe cleaner into small pieces and glue onto the pom poms to make a carrot nose. Using a small paintbrush, paint a smile on the pom poms by making 4-5 dots of black paint. Set aside the pom poms and let them dry.
- Using scissors, cut out cloud-shaped circles from the white felt to represent the melting snow. A good size to make these are 3-4 inches wide. Cut out small top hats out of the black felt.
- Glue the white pom pom head and black felt hat near the top on the white melting snow felt. Again, if working with kids use white glue, or else use a glue gun as it dries quicker.
- Cut about 3-4 inches of red ric rac trim for the scarf. Fold the trim in half and glue to the right or left of the white pom pom. Then, cut small “snowman hands” off the tree branches. Glue each of the branch arms to the melting snow.
- The last step is to glue 3 buttons to each felt snowman.
Video
Notes
You can use Elmer's glue or a glue gun. If you are working with kids, use the white glue just to be safe.
